How to Convert Your Bubble App to iOS and Android in 2026
Your Bubble web app is already powerful — here’s how to put it in your users’ pockets on both major mobile platforms without rebuilding from scratch.
Why Founders Want Their Bubble App on Mobile Stores
You built your MVP on Bubble.io — smart move. It gave you speed, flexibility, and a working product without a six-figure development budget. But somewhere along the way, your users started asking the same question: “Is there an app for that?” Being listed on the App Store and Google Play isn’t just a vanity metric; it signals legitimacy, drives organic discovery, and dramatically improves user retention.
The good news is that in 2026, converting a Bubble app to iOS and Android is more achievable than ever. You don’t need to rewrite your entire product in Swift or Kotlin. With the right wrapping strategy — and a clear understanding of what Apple and Google actually require — your Bubble web app can live comfortably in both stores. This guide breaks down every viable method, the trade-offs involved, and the exact steps to get there.
The Three Main Methods to Convert a Bubble App to iOS and Android
There is no single “correct” path — the right method depends on your budget, timeline, and how deeply you need native device features like push notifications, camera access, or biometric login. Here is an honest breakdown of each approach so you can choose with confidence.
WebView Wrapper
Package your Bubble app URL inside a native shell using tools like Median.co or Capacitor. Fast, affordable, and sufficient for most MVPs.
Progressive Web App (PWA)
Configure your Bubble app as a PWA so users can install it directly from the browser to their home screen — no store listing required.
Hybrid Native Build
Use Capacitor or React Native WebView with a custom native layer to unlock advanced device APIs while retaining your Bubble logic and UI.
For most early-stage startups, the WebView wrapper approach hits the sweet spot. It gets your Bubble app into both stores quickly — often within one to two weeks — and costs a fraction of a full native rebuild. Tools like Median.co (formerly GoNative) are purpose-built for exactly this use case and have approved thousands of apps across both stores.
How to Convert Your Bubble App to iOS and Android: A Practical Walkthrough
Regardless of which method you choose, the conversion process follows a predictable series of stages. Here is the exact sequence our team at SA Solutions walks clients through during a Discovery Sprint engagement.
Optimize Your Bubble App for Mobile
Before wrapping anything, ensure your Bubble app is genuinely mobile-responsive. Use Bubble’s responsive engine to test every page at 375px width. Eliminate horizontal scrolling, increase tap target sizes to at least 44px, and simplify navigation to a mobile-friendly menu pattern. A poor mobile web experience wrapped in a native shell is still a poor experience.
Configure Your Bubble App Domain and SSL
Your Bubble app must run on a custom domain with a valid SSL certificate before any wrapper can reference it reliably. Set this up in your Bubble app’s Settings under the Domain tab. Apple in particular performs security checks during the review process, and an app pointing to a non-secure URL will be rejected immediately.
Choose and Configure Your Wrapping Tool
For the WebView approach, sign up with Median.co or a similar service. You will input your app’s URL, configure navigation gestures, set up deep linking, and define which device permissions your app needs. At this stage you also upload your app icons and splash screens — create these at the required resolutions (1024×1024 for iOS, 512×512 for Android) before starting.
Integrate Push Notifications
Push notifications are the single biggest engagement driver for mobile apps. Most wrapping tools provide their own JavaScript bridge to send push events from your Bubble backend. You can trigger these via Bubble’s API workflows — when a user receives a new message or their order status changes, for example. Configure the notification payload carefully: Apple requires explicit user permission prompts within the app itself.
Set Up Apple and Google Developer Accounts
You will need an Apple Developer Program membership ($99/year) and a Google Play Developer account ($25 one-time). Both require a valid business or personal identity verification. Budget one to three business days for Google and up to 48 hours for Apple account activation. These accounts are where you manage your app listings, screenshots, and release schedules going forward.
Build, Test, and Submit
Generate your IPA (iOS) and APK/AAB (Android) build files from your wrapping tool. Test both on real devices — not just simulators — before submitting. Apple’s review process typically takes one to three days; Google Play can be as fast as a few hours for the first review. Prepare your app store listing copy, screenshots, and privacy policy URL in advance to avoid back-and-forth delays.
Pro Tip: Screenshot Strategy Wins Reviews
Apple and Google both evaluate your store screenshots as part of the review. Create screenshots that show real app functionality on actual device frames. Use tools like Previewed or Rottengrapes to generate professional-looking store graphics in under an hour — this directly impacts conversion once your app is live.
What Causes Bubble App Rejections — and How to Avoid Them
App store rejections are frustrating and costly in time. The majority of rejections for Bubble-based WebView apps fall into a predictable set of categories that are entirely avoidable with preparation. Understanding Apple’s and Google’s stances on web-based apps is critical — both platforms have tightened their policies on “thin wrapper” apps that add no value beyond a mobile browser visit.
-
✓
Ensure your app has native-feeling navigation and gestures, not just a bare browser window
-
✓
Include at least one native feature (push notifications, camera access, or biometric login) to justify the native wrapper
-
✓
Write a clear, honest App Store description that matches what the app actually does
-
✓
Have a working privacy policy URL live before submission — both stores require it
-
✓
Remove any external payment links that bypass Apple’s in-app purchase system (for paid features)
-
✓
Test on a real iPhone and real Android device — not just in-browser responsive mode
Apple is notably stricter than Google when it comes to WebView-based apps. Their guideline 4.2 (“Minimum Functionality”) is the most common rejection reason for Bubble conversions. The solution is to ensure your app genuinely delivers a useful, focused experience and that it leverages at least one native device capability. If your Bubble app already has rich functionality — a marketplace, a SaaS dashboard, a booking platform — you are in good shape. A landing page wrapped in an app shell is not.
Why Founders Work With SA Solutions for Mobile Conversion
Converting a Bubble app to iOS and Android sounds straightforward — and in theory, it is. In practice, founders routinely underestimate the time spent troubleshooting rejections, configuring push notification infrastructure, handling deep linking, and managing the back-and-forth with Apple’s review team. At SA Solutions, we have guided multiple Bubble-powered products through the full mobile deployment process.
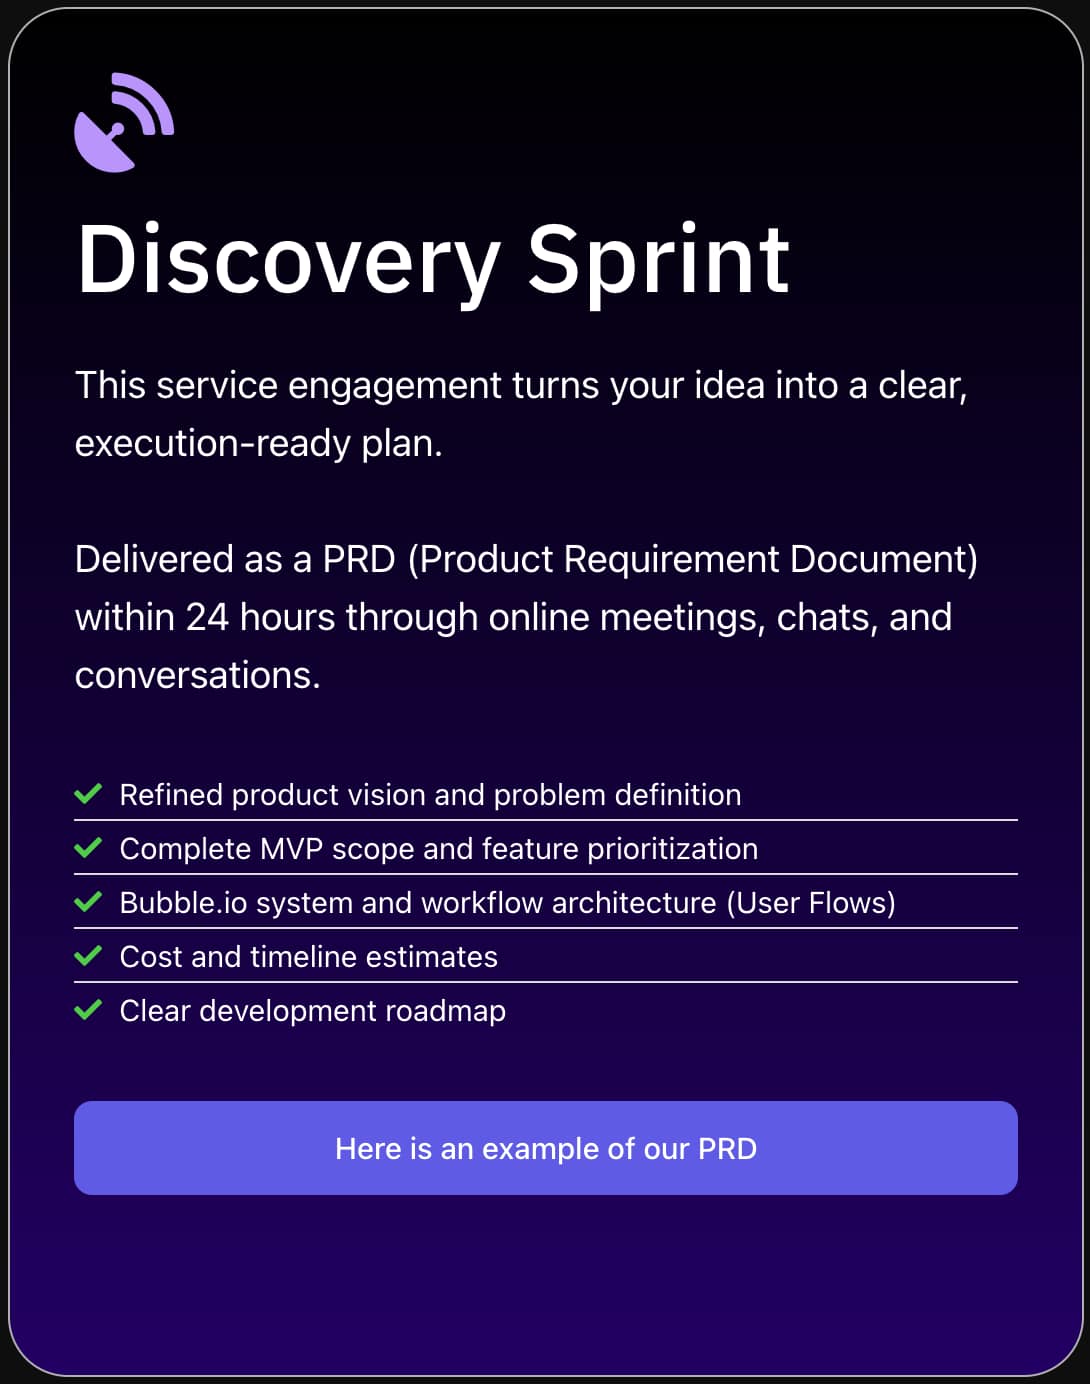
Our process starts with a Discovery Sprint — a focused engagement where Athar Ahmad and the team map your app’s current architecture, identify any mobile-readiness gaps, and define the exact wrapping and native integration strategy that fits your product. You leave with a clear scope, a realistic timeline, and no surprises during the submission process. Whether you need a straightforward WebView wrapper or a more sophisticated hybrid build with offline support and biometric login, we build it correctly the first time.
Start With a Discovery Sprint
Before investing in a mobile conversion, a Discovery Sprint helps you validate the right approach. In a single focused session, we assess your Bubble app’s mobile readiness, estimate the effort required for each conversion method, and give you a clear recommendation — so you make decisions based on data, not guesswork.
Frequently Asked Questions
Can I really get a Bubble app approved on the Apple App Store?
Yes — many Bubble-based apps are live on the App Store in 2026. The key is ensuring your app delivers genuine functionality and leverages at least one native device feature such as push notifications or camera access. Apple’s guideline 4.2 targets low-effort wrappers, not fully functional web applications wrapped thoughtfully in a native shell.
How long does it take to convert a Bubble app to iOS and Android?
A well-prepared WebView conversion typically takes two to four weeks end-to-end, including mobile optimization, wrapper configuration, store account setup, and review cycles. More complex builds that require native integrations or significant UI redesigns for mobile can take six to ten weeks. Starting with a Discovery Sprint helps you get an accurate estimate for your specific app.
Do I need to rebuild my Bubble app to add it to the Google Play Store?
No. You do not need to rebuild your Bubble application to list it on Google Play. Using a WebView wrapper or Trusted Web Activity (TWA) approach, your existing Bubble app can be packaged as an Android application without rewriting any of your logic or workflows. Google Play’s policies are generally more permissive than Apple’s for web-based apps.
What is the cost of converting a Bubble app to mobile?
Costs vary depending on the approach. A DIY WebView wrapper using a service like Median.co costs roughly $50–$150 per month for the tool subscription, plus $99 for an Apple Developer account and $25 for Google Play. Hiring a certified Bubble agency like SA Solutions to manage the full conversion — including mobile optimization, push notifications, and store submission — typically ranges from a few hundred to a few thousand dollars depending on complexity.
Will my Bubble app work offline after being converted to a mobile app?
Standard WebView wrappers require an internet connection because they load your live Bubble app URL — there is no local data storage. For true offline functionality, you would need a hybrid native build that caches specific data on the device. This is a more involved integration but is achievable for high-priority use cases like field service tools or apps used in low-connectivity environments.
Ready to Get Your Bubble App Into the App Stores?
SA Solutions is a certified Bubble.io development agency led by Athar Ahmad. Book a free Discovery Sprint to map out your mobile conversion strategy, timeline, and budget — no commitment needed.