How to Integrate OpenAI with Bubble.io and Build Smarter Apps in 2026
Add real AI intelligence to your no-code product — without writing a single line of backend code.
Why Founders Are Integrating OpenAI with Bubble.io in 2026
In 2026, AI is no longer a differentiator — it’s a baseline expectation. Users want apps that understand natural language, generate content, summarize data, and respond intelligently. OpenAI’s API, powered by models like GPT-4o, gives you exactly that. And Bubble.io gives you the fastest way to wire it into a full-stack product without a traditional dev team.
The combination is genuinely powerful. Bubble handles your database, UI, workflows, and user authentication. OpenAI handles the intelligence layer. Together, they let a solo founder or a small team ship a production-grade AI app in weeks rather than months. That’s the exact advantage SA Solutions helps clients unlock every day.
Whether you’re building an AI writing assistant, a smart CRM, a legal document reviewer, or a customer support chatbot, the OpenAI + Bubble.io stack is one of the most cost-effective and scalable paths available to non-technical founders right now.
What You Need Before You Start
Before diving into the integration, make sure you have the right accounts and settings in place. The setup is lightweight — most founders are ready to connect within 30 minutes.
-
✓
A Bubble.io account (any paid plan enables the API Connector plugin)
-
✓
An OpenAI Platform account at platform.openai.com
-
✓
An active OpenAI API key (generate one under API Keys in your OpenAI dashboard)
-
✓
The Bubble API Connector plugin installed in your app
-
✓
A clear use case: chat, content generation, classification, or summarization
-
✓
Basic understanding of Bubble workflows and dynamic data
One important note: store your OpenAI API key securely. Never hard-code it into a client-side call. In Bubble, mark the key as private in the API Connector so it’s only used server-side. This is a non-negotiable security practice that SA Solutions enforces in every build.
How to Integrate OpenAI with Bubble.io: Step-by-Step
Follow these steps to make your first successful OpenAI API call directly from a Bubble.io workflow. This walkthrough uses the Chat Completions endpoint — the most versatile starting point for almost any AI use case.
Install the API Connector Plugin
In your Bubble editor, go to Plugins → Add Plugins and search for “API Connector.” Install it. This plugin is Bubble’s built-in bridge to any external REST API, including OpenAI. It requires a paid Bubble plan to use in production.
Create a New API in the Connector
Open the API Connector plugin settings and click “Add another API.” Name it “OpenAI.” Under Authentication, select “Private key in header” and set the key name to Authorization with the value Bearer YOUR_API_KEY. Mark this as private so it never exposes to the frontend.
Configure the Chat Completions Call
Click “Add another call.” Set the method to POST and the URL to https://api.openai.com/v1/chat/completions. In the Body section, add your JSON payload with the model (e.g., gpt-4o), a system message, and a dynamic user message parameter. Mark the user message as a parameter so Bubble can pass it dynamically from your UI.
Initialize and Parse the Response
Click “Initialize call” with a sample prompt. Bubble will parse the JSON response structure automatically. You’ll see fields like choices[0].message.content — this is your AI-generated text. Bubble maps this into a reusable data type you can reference in any workflow.
Trigger the Call from a Workflow
Build a workflow on any button click or page event. Add the action “Plugins → OpenAI – Chat Completions” and pass your dynamic user input from a text input element. Use the result to update a database field, display it in a text element, or pass it to the next workflow step.
Display the AI Output in Your UI
Use a Bubble text element or repeating group to display the AI response. For chat-style interfaces, save each message to a Bubble database table with fields for role (user/assistant), content, and timestamp. Fetch them in a repeating group sorted by creation date to build a real conversation thread.
Pro Tip: Use System Prompts Strategically
Your system prompt is where you define the AI’s personality, constraints, and role. A well-crafted system prompt dramatically improves output quality. Store it as an Option Set or App Data field in Bubble so you can update it without redeploying your app.
What You Can Build: OpenAI + Bubble.io Use Cases
The OpenAI + Bubble.io integration unlocks a surprisingly wide range of product categories. Here are six high-value use cases that SA Solutions has helped founders build and launch in 2026.
AI Chatbots
Build customer support bots, onboarding assistants, or sales agents that understand natural language and remember conversation context stored in Bubble’s database.
Content Generators
Let users generate blog posts, product descriptions, social captions, or email drafts at scale — with brand-specific tone defined in your system prompt.
Document Summarizers
Accept uploaded text or pasted documents and return structured summaries, key takeaways, or action items — ideal for legal, HR, and research SaaS products.
Smart Search & Classification
Use OpenAI to classify user submissions, tag content automatically, route support tickets, or power semantic search across your Bubble database records.
Data Analysis Tools
Pass structured data to OpenAI and get plain-English insights back. Build dashboards where non-technical users can ask questions about their own data in natural language.
AI Tutors & Coaches
Create personalized learning experiences, interview prep tools, or coaching platforms where the AI adapts its guidance based on user history stored in Bubble.
Common Mistakes and How to Avoid Them
Integrating OpenAI with Bubble.io is straightforward, but there are a handful of mistakes that consistently trip up first-time builders. Knowing them upfront saves hours of debugging.
-
✓
Always mark your API key as private in the Connector — never expose it client-side
-
✓
Set a maximum token limit to control costs — uncapped calls can drain credits fast
-
✓
Add error handling workflows for when the API times out or returns a 429 rate-limit error
-
✓
Use Bubble’s “Schedule API Workflow” for long-running or batch AI tasks to avoid frontend timeouts
-
✓
Store conversation history in the Bubble database — don’t pass entire histories in every call to avoid token bloat
-
✓
Test your prompts extensively before going live — small wording changes produce dramatically different outputs
Rate Limiting & Cost Control
OpenAI charges per token. In production apps with many users, costs can scale quickly. Implement per-user rate limits in Bubble using a “last API call” timestamp field and a conditional check before triggering the workflow. SA Solutions builds this into every AI-powered Bubble app as a default safeguard.
If you’re planning to handle sensitive user data — medical records, financial information, or personal identifiers — make sure you review OpenAI’s data usage policies and consider opting out of training data sharing via your API settings. This is a compliance step, not an optional one.
When your app reaches meaningful scale, consider moving to a custom backend proxy (built with Bubble’s backend workflows) that sits between your frontend and OpenAI. This gives you better logging, monitoring, and the ability to swap AI providers without touching your UI layer.
Frequently Asked Questions
Do I need coding skills to integrate OpenAI with Bubble.io?
No coding is required. Bubble.io’s API Connector plugin handles the connection using a visual configuration interface. You’ll need to understand basic concepts like HTTP methods, JSON body structure, and Bubble workflows — all of which are learnable without a programming background. SA Solutions also offers done-for-you integration if you’d rather skip the learning curve entirely.
Which OpenAI model should I use in my Bubble.io app?
In 2026, GPT-4o is the recommended default for most production use cases — it offers an excellent balance of speed, intelligence, and cost. For simpler tasks like classification or short-form generation, GPT-4o-mini is significantly cheaper and fast enough for real-time interactions. Start with GPT-4o, then optimize down once you understand your actual usage patterns.
How much does it cost to run OpenAI in a Bubble.io app?
Costs depend entirely on how many tokens your app processes. A typical chatbot message exchange costs fractions of a cent with GPT-4o-mini. A high-traffic SaaS with thousands of daily users could run anywhere from $50 to $500+ per month on API costs. Set usage limits per user in Bubble and monitor your OpenAI usage dashboard weekly when you first launch.
Can Bubble.io handle streaming responses from OpenAI?
Bubble’s native API Connector does not support streaming responses out of the box — it waits for the full response before displaying results. For a streaming effect (where text appears word by word), you’ll need a workaround using Bubble’s backend workflows with polling, or a lightweight JavaScript plugin that handles the stream. SA Solutions has built this pattern for several clients who needed a premium chat experience.
How long does it take to build an AI-powered app with Bubble.io and OpenAI?
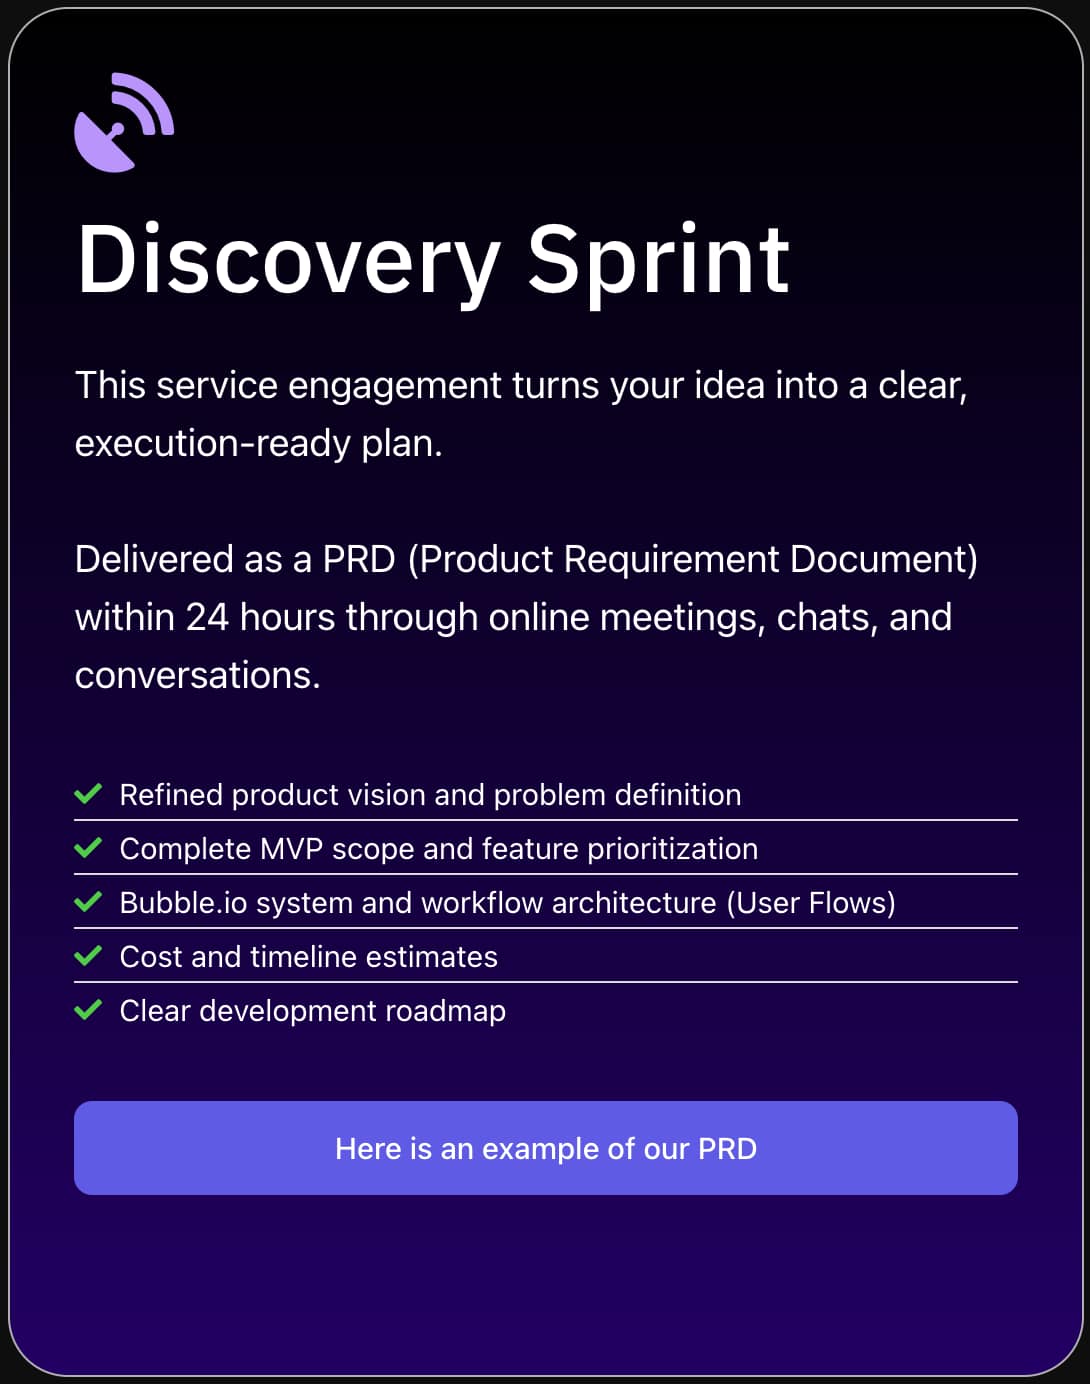
A focused MVP with a core AI feature — like a content generator or support chatbot — typically takes 4 to 8 weeks with an experienced Bubble developer. SA Solutions starts every engagement with a Discovery Sprint that maps out your full product scope, user flows, and technical requirements so there are no surprises mid-build. Book a free call to get a timeline specific to your idea.
Ready to Build Your AI-Powered App?
SA Solutions is a certified Bubble.io development agency led by Athar Ahmad. We’ve helped founders across industries integrate OpenAI with Bubble.io to launch AI products that actually work at scale. Book a free Discovery Sprint to map out your product scope, timeline, and budget — no commitment needed.